Thursday, May 5, 2011

Stash Enhancement

On my day off this week I decided to stop by fabric heaven, aka Rainbows End Quilt Shop.  I have to tell you, just walking in to the place is good for the crafty soul.  There is inspiration everywhere with shop samples and lots of fun extras, like gorgeous woven ribbons, fabric glitter, patterns and quilting supplies galore.  I was looking for some Breakfast at Tiffanys to add to an upcoming project, but I didn't find any.  Not to worry though, I found plenty of other trouble! 

Some red fat quarters for no special reason, other than I adore red.  The top right is tiny dark red polka dots on a tomato red background.


I was also looking for fabric to go with this gorgeous Flower Fairy panel from Michael Miller.  Last fall while I was waiting for some yardage to be cut at the very same shop, the lady ahead of me showed me what she was getting and I just couldn't resist.  (Temptation is everywhere at this shop!)  I impulsively bought the panel, figuring if my niece didn't like it I could find another recipient, but she does and I want to get to work on it soon.  Of course I forgot to take the panel with me, so I was guessing as to whether any of these fabrics would work.  I couldn't find any other coordinates from the original panel, but I think one of these will do, don't you?


And then I found some other cute prints I just couldn't pass up.  The cupcakes will become a half apron for me to wear at work and the girly pattern will probably become a drawstring bag for travel and toting various things around.  If I still had a vanity, I'd re-upholster the chair with the girly print, but alas there is no vanity in the house I'm living in now.

I'm on a semi-fabric diet.  My plan is to use up some of what's in the stash already, but you know you never seem to have exactly everything you need once you settle on a pattern.  At least that is what I am finding in my own stash.  The red FQs above were half off, and I don't have a specific plan for them, but I'm sure I'll find some way to use them!

Monday, May 2, 2011

Some Lessons Learned

Now that I've finished my first quilt project, I am obsessed with quilting and I can't get enough.  The next project I wanted to work on is a quilt to cover the backseat of the car, to protect the upholstery from doggie detritis.  I usually use a fleece blanket or a quilt I got at Marshalls, but I really want to make something new and fresh for Katie.  I had two panels of Lakehouse Fun Flowers and I thought they'd make a fun, quick quilt.


Isn't that pretty?  I took this photo before I was finished with the flimsy, so you'll see 8 blossoms in the final.  The green sashing and the backing are part of Mezzanine by Patty Young from Michael Miller.  I love the pink and green, since its so cheerful & springy.

I'm rather far along in the process of quilt number two now, and I thought I'd share a few lessons I've learned in just two quilts worth of work.

Spray baste is your friend.  I had such a hard time with the Daisy Chain quilt in the pin basting process - I just couldn't get everything straight and even and where I wanted it to go.  This time I used spray baste before pinning and it makes things so very much easier.  With the spray, it seemed easier to smooth out the fabric and batting, and then pinning was a breeze.  I used my dining room table and foolishly sprayed without covering the table, so now I have spots where lint is collecting.  Note to self:  be sure to throw an old sheet over the basting surface.  It creates a somewhat stiff sandwich, but I'm finding it easier to quilt.

Go slow and do your best.  My mom used to tell me that all the time, and I can hear her voice telling me the same thing as I quilt.  It is a challenge to shove the sandwich past the needle perfectly, but practice does make better.  One of these days it'll get closer to perfect.


Go ahead and wad it up.  It'll be okay.  It's much easier to smush the sandwich through the neck of my standard sewing machine if its rolled up.  The quilt bounces back quite nicely.  I'm not quite sure why I thought I needed to be all prim and proper with it and keep it flat, but no longer. 

You need a large clear surface.  This should probably come first.  My sewing set-up is a little odd, and I hate putting things away.  This is a bad combination for sewing anything over a 12 inch block.  As the flimsy got bigger, and then once I began quilting, the sandwich started knocking things off my tables and driving me insane.  Taking 10 minutes to put things away and clear the space was hugely valuable.  I will try harder to keep things tidy to keep from going batty.

Nike was right.  Just do it.  Prior to the Daisy Chain, I'd done alot of household sewing projects, small applique, and cut fabrics for about four different projects, but I hadn't been able to bring myself to start putting a quilt together.  I'm not quite sure what my hang up was, but now that I've gotten to work and finished one quilt in its entirety, I'm thinking there is nothing I can't do!

Isn't it fun to learn along the way?  What have you discovered lately?

Sunday, May 1, 2011

Finished Object

Since I didn't get a full photo the other day, here's my new beauty!  The sun hat is there for scale, and because its cute.


I wanted to get a good shot of Katie on it, but of course she wasn't interested.  Silly dog.


Happy May Day!

Happy May Day to you!  May Day means alot of different things to different people, but for me its all about the beginning of Spring and FLOWERS!  When I was a little girl, I used to pick violets from our yard, place a bouquet on the front porch for my mom, ring the doorbell and run away.  Of course she knew who they were from, but she played along any way.  What else would a mom do, right?  I can't bring her violets any more but I sure am thinking of her today.

In Annapolis, Maryland they have a lovely tradition of celebrating May Day by putting flower baskets outside, both residents and local businesses and the town explodes with color and creativity.  People come into town from all over on May Day, even buses of people from Baltimore and they walk the streets downtown, enjoying all the gorgeous flower arrangements.  When my shop was in Annapolis, I had a great time coming up with a new theme each year.  This is from a couple of years ago - a butterfly themed basket complete with butterfly house, two art glass butterfly feeders and feather butterflies all over.


Hope you have a beautiful, flowery day with a lift in your heart at the start of a new season!

Saturday, April 30, 2011

Pinwheels Easy as Pie!

Did someone say pie?  Sorry - I distracted myself there for a moment.

Have you seen this tutorial from Missouri Star Quilt Company on an easy way to make HST's and then pinwheels?  (Be sure to check out her ironing board cover - I love that fabric!)


Super easy!  Look what I did this morning ...


Love it!  I used two 5 inch squares and ended up with a block that is about 5.75 inches large.  I had a few minutes before work so I only finished one.  I can't wait to get home and get back to it!

Friday, April 29, 2011

Rack 'em up!

The Daisy Chain lap quilt is finally finished and has been duly tested several evenings in a row on the couch.  Here it is on a quilt rack that my mom purchased for me ages ago.  I wish she could see the rack with my own quilt on it.   


This is my first quilt, so please gently ignore any crooked seams or things you would have done differently.  This was the brightest room in the house today, so would you please also excuse the presentation on the doors of my fabric stash cabinet!?!? I couldn't bear to put it on the floor just yet for a full photo shoot.  How silly is that?  Here's the front:


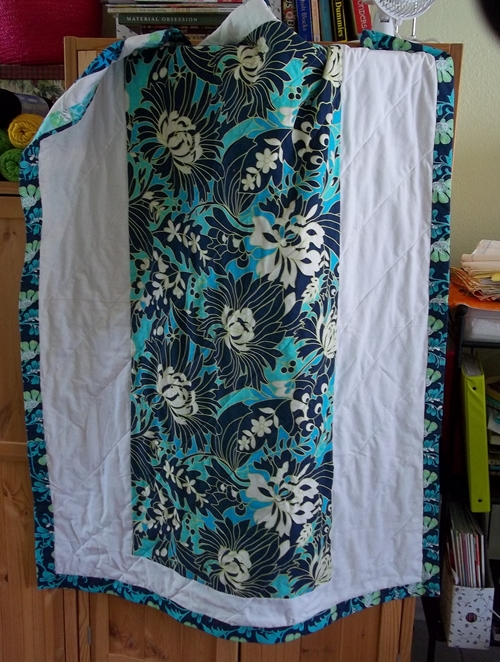
And the back:
It completely slipped my mind to make a label, so I intend to embroider the details or applique a label soon.  I love the large panel in the back.  It's visually soothing compared to the front.  I just read a great blog post by Julie of Jayburd Quilts over on the Robert Kaufman blog.  She shared some wonderful photos of her quilt backs and opened the discussion to ask how people like to prepare their backs.  Since this is a lap quilt which will live on my couch and get lots of use, I didn't want the back to be scrappy or seem unplanned.  The math was easy to figure out with one large leftover bit and a frame of white.  The wide binding was a way to fix an error that happened during quilting.  Ooops - the cat is out of the bag now!

Not bad for a first try!  I'd like to do a coordinating pillow cover for a throw pillow, and then my next project is a narrow quilt to fit on the backseat of my car for Katie's travels.  Let's be honest, its to protect the backseat upholstery from muddy, leafy, dirty, detritis-filled paws!

Happy stitching!


Friday, April 1, 2011

It was a dark and stormy night....

I couldn't play in the garden yesterday because we had such terrible thunderstorms all day, so I hit the sewing machine instead.  I made great progress on my Daisy Chain quilt.  I added the aqua border (even though I wanted to start quilting it right away) and I'm really glad I did. I think it adds a cheerful touch.

This is my first quilting project where I've actually gotten far enough along to quilt.  I have lots of WIP's, but no finished objects.  Its a lap quilt, so I cleared off the dining room table to baste the sandwich.  It's so challenging!  Now I understand why this is almost everyone's least favorite part.  Most experts recommend cutting the batting larger than the top because of how things move when you quilt, but then how can you be sure your top is perfectly matched to the backing?  Oh the headache that ensued!  I even left the backing a little larger than it needed to be, but no matter how I wigged things around and pinned and re-pinned, I still ended up with an uneven sandwich.  For my first try, its not too bad, but its no where near professional looking.


Here we are, pinned and ready to be quilted!

 After dinner I headed to the machine to quilt.  It was definitely an experience!  I did simple straight line quilting, with the normal foot and white thread.  Diagonal lines across the charm squares in only one direction.  I considered using a colored thread to quilt, but I went with white and I'm happy with the outcome.  It was manageable in my little Singer - I just rolled up the right side of the sandwich to keep control as I stitched.  You can really tell as you stitch across the seams - the machine sounded different.  I had to rip one line because I ran out of bobbin thread but other than that (and some crooked sewing) it was kind of fun!  Stressful but fun.  I didn't mark the top at all, just eyeballed it (hence the crooked sewing!) which added to my anxiety.  I could almost hear my mom saying "just take your time and do your best!"


I created a panel of the large scale print with white sashing for the backing.  All that's left is the binding which will be a navy print from the line.  I'm so excited, and so proud of myself for getting this far.  I can't wait to snuggle up with the finished product!